How to Install Axolotl on HPC environment
TLDR; use containerization solutions instead of installing axolotl: docker or apptainer (for HPC)
Update log:
    [April 2026] Added Troubleshooting and sandbox section
Introduction#
You probably already know this but Axolotl (as documentation puts it) is…
A Free and Open Source LLM Fine-tuning Framework
My main use case was to fine-tune Llama-3.2-3B-Instruct on a synthesized/generate tool calling dataset. This was in an HPC environment provided by NHR@FAU .
Installation approaches#
There are two main approaches for installing Axolotl on systems.
1. Containerization (highly recommended!)#
Apptainer on HPC#
If you are working in HPC environment or a system that is managed externally or shared among many users, it is most likely that there is no support for Docker. Apptainer is the containerization solution on HPC and such environments.
Below is the command that you can use to pull the axolot image (.sif) file and run it as a container.
mkdir axolotl && cd axolotl # or just change directory where you want the .sif file exist
apptainer pull axolotl.sif docker://axolotlai/axolotl:main-latest # pull the image
apptainer exec --nv axolotl.sif accelerate --help  # check if everything works
apptainer cache clean  # for me running this released ~40GB of disk space
Docker#
If Docker is available on your system, you can easily pull the image according to the documentation instructions here .
2. pip/conda/uv (could not make it work)#
Just to give you a heads up if you wanna go down this path, it took me 4 hours of trying searching and checking with 4 different AI assistants (ChatGPT, Groq, Gemini, Claude) and trying different installation orders (i.e. installing pytorch before flash-attn) and pinning different CUDA versions, python, and pytorch.
In my honest opinion you should not install Axolotl this way. In the future, I do my best to avoid installing such packages with python package managers and I will directly look for containerized solutions.
I allocated 1 GPU to make sure GPUS are available when installing (was hoping it would have some effects) and with 16 CPU cores available. Here is the CPU utilization during the installation of axolotl using pip. This should give you clear idea of how things will be if you try to install it with pip.
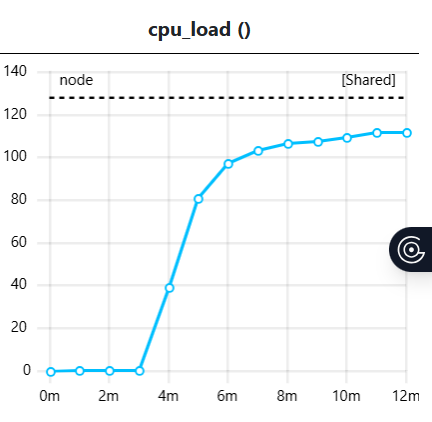
CPU utilization during Axolotl installation using pip
All the cores were fully busy and the installation ended up running into a build error.
Troubleshooting with Sandbox#
This part is the latest fruitful experience I had with containers.
Problem#
When building the image file (.sif) file from a definition file (.def), chances are that you run into system errors that might stem from the container, some package requirements, or even correcting path to executables. For example, if you wanna install uv (the package manager), the executable can be put in different places (one of which can be /root/.local/bin/uv) and just running plain uv does not work.
Solution#
Running things as sandbox helps you with experimenting and understanding the container. You can install packages, peak into directories, libraries, finding executables paths, available commands or anything that might be relevant to your work. You can see how things would play out and what you should do specifically when you want to write your definition file.
Unless… you don’t even need to write the .def. With sandboxes you can directly package them into .sif files. All the packages installed in the sandbox, all the changes applied there would be in the final .sif file. This is a strong approach to overcome the system-related failures (funny enough, we started using containers to prevent system-related failure and dependencies but here we are again). Based on my experience, these system-failures are significantly less than tackling the installation without containers and sandboxes.
Sample workflow for sandboxes#
We build rocm_vllm.sif file that contains vllm and rocm libraries to run on AMD MI300x GPU.
apptainer build --sandbox rocm_vllm_sandbox/ docker://rocm/pytorch:rocm7.2.1_ubuntu24.04_py3.12_pytorch_release_2.9.1
apptainer shell --writable --fakeroot rocm_vllm_sandbox  # `fakeroot` helps you with installation and `writable` is necessary for applying changes and installation
After the commands above, you will be logged into the sandbox and have shell access. You can do anything now, like installing uv package manager.
curl -LsSf https://astral.sh/uv/install.sh | sh
export PATH="$HOME/.local/bin:$PATH"
uv pip install vllm --extra-index-url https://wheels.vllm.ai/rocm/ --upgrade
And then you build the sandbox into a .sif file.
apptainer build rocm_vllm.sif rocm_vllm_sandbox/
VLLM example#
This is a definition file that create a .sif which you can use to serve LLM.
Create a vllm.def file and copy the content below inside.
Bootstrap: docker
# From: nvcr.io/nvidia/cuda:12.8.1-cudnn-devel-ubuntu22.04
From: nvcr.io/nvidia/cuda:12.8.1-cudnn-runtime-ubuntu22.04

%labels
    Author your-name
    Version 1.0
    Description vLLM container with CUDA 12.8.1

%environment
    export PATH=/opt/venv/bin:$PATH
    export PYTHONPATH=/opt/venv/lib/python3.11/site-packages:$PYTHONPATH

    # CUDA / GPU environment
    export CUDA_HOME=/usr/local/cuda
    export PATH=$CUDA_HOME/bin:$PATH
    export LD_LIBRARY_PATH=$CUDA_HOME/lib64:$LD_LIBRARY_PATH

    # vLLM tuning knobs (adjust as needed)
    export VLLM_WORKER_MULTIPROC_METHOD=spawn
    export NCCL_DEBUG=WARN

%post
    set -e

    # ── System packages ────────────────────────────────────────────────────────
    apt-get update -y && apt-get install -y --no-install-recommends \
        python3.11 \
        python3.11-dev \
        python3.11-venv \
        python3-pip \
        git \
        curl \
        wget \
        build-essential \
        libssl-dev \
        libffi-dev \
        libnuma-dev \
        && apt-get clean && rm -rf /var/lib/apt/lists/*

    # Make python3.11 the default
    update-alternatives --install /usr/bin/python3 python3 /usr/bin/python3.11 1
    update-alternatives --install /usr/bin/python  python  /usr/bin/python3.11 1

    # ── Virtual environment ────────────────────────────────────────────────────
    python3 -m venv /opt/venv
    . /opt/venv/bin/activate

    pip install --upgrade pip setuptools wheel

    # ── PyTorch (CUDA 12.8 / cu128 wheel) ─────────────────────────────────────
    pip install torch torchvision torchaudio \
        --index-url https://download.pytorch.org/whl/cu128

    # ── vLLM ──────────────────────────────────────────────────────────────────
    # Pin a specific release for reproducibility; bump as needed.
    pip install vllm==0.13.0

    # ── Optional: common serving / monitoring extras ───────────────────────────
    pip install \
        accelerate \
        transformers \
        huggingface_hub \
        sentencepiece \
        protobuf \
        ray

    # Cleanup
    pip cache purge

%runscript
    #!/bin/bash
    # Default: launch the vLLM OpenAI-compatible server.
    # Override by passing arguments:
    #   apptainer run vllm.sif python -m vllm.entrypoints.openai.api_server ...
    exec python -m vllm.entrypoints.openai.api_server "$@"

%test
    . /opt/venv/bin/activate
    python -c "import torch; print('PyTorch:', torch.__version__)"
    python -c "import torch; print('CUDA available:', torch.cuda.is_available())"
    python -c "import vllm; print('vLLM:', vllm.__version__)"
You can set a cache directory (which I highly encourage since the cache can grow up to 40GB or more) and build like this.
APPTAINER_CACHEDIR=/home/atuin/username/containers/cache/  # adjust to point to cache directory
apptainer build --fakeroot vllm.sif vllm.def
After building you get a vllm.sif file which you can test if it works by running the following test command.
apptainer test --nv vllm.sif
And finally, you can run it like this:
OpenAI-compatible API server (default):
apptainer run --nv \
  --bind /path/to/models:/models \
  vllm.sif \
  --model /models/your-model \
  --host 0.0.0.0 --port 8000
Custom command (override runscript):
apptainer exec --nv vllm.sif python -c "import vllm; print(vllm.__version__)"
Lessons learned#
For such complicated packages that are highly dependent on multiple big packages and CUDA version, it is almost mandatory to use these packages through their containerized version.
I am open for collaboration. I am interested in solving and talking about problems related to serving AI and the system operations around it. If you have problems related to reliable deployment of AI systems (on cloud, HPC or even on-perm), feel free to write me an email.